Showing posts with label Pazzles. Show all posts

Tuesday, February 12, 2013

Honeycomb Heart Using Stampin' Up Brushes

I have finally begun to craft again since I broke my arm last year. Here is a picture of the cute little Honeycomb Heart I made for my Valentine Tree. {Yes I have a 6 ft metal holiday tree for all holidays!} This Honeycomb method is fun to do and if you only want to do a half of one then glue each side to a card center and open up the card and viola an adorable Honeycomb insert card inside!  You have to cut out at least 15 hearts and glue them back to back in specific places to make the honeycomb. You can use any cutting machine like the Silhouette Cameo or Pazzles or the KnK Zing or Framelits by Sizzix or Spellbinders dies they will all work. My instructions came from the blog "Amazing Paper Grace" by Becca Feeken.
I did a lot of crafting last year but not all papercrafting. I will be posting these images soon too....fiber art, tole painting, machine knitting etc. I have been holding off because this blog was started for my papercrafting but I have branched out into so many different areas that they all tie in together. When people ask me what I do or what I am, I respond with I am a "Cross Crafter"  All my crafts cross over into each other.


Monday, August 22, 2011

Node Editing: A quick overview video

 Now that I have my Camtasia set up on this computer, I decided to do a little video on editing nodes with the arc replace tool. Enjoy!


Cutting files for free ...not always a good quality = frustration and blame in the wrong place

I have been using cutting machines for many years now. I now have quite a few of these electronic monsters...yes I am addicted. Certain machines will cut certain files differently, some with better accuracy than others. Software has to do with this also because software is what is giving the machine the commands to cut. I started with a version from Signmax and have used Funtime/Pazzles, SCAL, &  MTC to name a few. I am now designing mostly in Adobe Illustrator and sending these files to my various cutting softwares. Klo can attest to the fact I am PICKY about my files!
Just a thought for newer people to ponder...
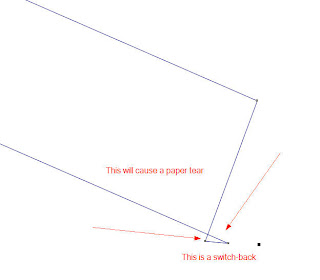
Are you getting your cutting files from websites for free? If you are getting these free files, look at them closely. These files may look pretty at first but once you magnify up on them...they are not such pretty files. Look closely and you will find loop-backs/switch-backs, points and corners too tight for the blade to make a good cut. Sometimes there will be double cutting lines or even an invisible cut line way out of your image that you do not even know is there. Also look at the amount of nodes. The more nodes, the more time it takes the software to calculate the cut. Then the machine will cut very slowly depending on the software you are using with what machine. I have included 2 pictures from a "FREE" download site and 2 random files I picked. Both of these free files had some major issues that I was able to see. After downloading many of this sites files, I found each one to have many problems that a newer user would not identify easily.  These issues would make a newer user frustrated with the quality of the piece that they cut... not the machine's fault but the file. I made sure that my images are not identifiable as to what "free" site they came from. I am not here to bash the person that creates them, only to make people aware that not all files are created equal. I look back at some of my files that I produced in my first year or two and I cringe at some of them and the problems I now see with them.
My point is that if you are new to this, use files from a well known source either purchased or designed by someone that knows what they are doing. LEARN your software and how to spot these "not so user-friendly" files. Start with simple images and learn your particular machine's cutting ability. Do not start with a complicated file that you downloaded for free. Free is just that, no guarantee unless you really like to be frustrated. Yes these free files cause lots of frustration. But then the blame gets shifted to the machine and the company that produced the machine...and then people write their frustration out bashing the machine or software...when all along it was that one free file you tried to cut...... Complicated intricate files should be cut with good quality paper and a sharp blade set "just right". Test cut an area first before you ruin that whole piece of nice paper. Do you live in a damp 40% plus humidity area? Then your paper may be harder to cut. I am a Stampin' Up demonstrator and our paper can be very temperamental to cut with humidity. Ok back to my point of free files....start with files from ex: Pazzles Craft Room or Scrap-Savvy or My Time Made Easy or many other trusted sites. Look close at their files, most of these files are excellent cutting files and will show you what a good file should be. Do not make a complicated file smaller to fit a small card if it was made for a bigger card or 12 x 12 layout.
Oh yes above all!!!! Do not wait till the last minute to learn your machine when you have to get something done... this will always end up in disaster and frustration...you know Murphy's law. Watch Klo's videos, Use Julie F.'s tutorials, go to You Tube and watch.
Disclaimer: No particular incident, person or site sparked this email, well Ok maybe one...hehe.  HAVE FUN!


Friday, October 30, 2009

My First Video Tutorial Yahoo! Funtime/Pazzles Software layers and cutting

I have always learned things better by seeing it done, not by reading about it. Someone asked a question on one of the Yahoo groups the other day about the Funtime/Pazzles Software and changing the layer order for cutting. I bit the bullet and downloaded Camtasia 30 day free trial. Great program! A bit pricey for some but I will be buying it! I made my first video last night to show a simple way of changing layers to get the layers in order for better cutting on the page. It is my first video so be kindd and excuse the abrupt ending. I had to cut the vdeo into two because You Tube only will take 10 minute videos....Bahhhh... I was 12 minutes and 31MB..Ok that was a big file.
So here is the link:


Down the line I hope to do other videos on Stampin' Up's new "My Digital Studio" and various other crafting endevours.

Wednesday, October 7, 2009

Cherry Cake Box

Another "Cake Box" But this one is one of my favorite retired Stampin Up papers of last year. One thing about dark papers when you use a "kiss cut" fold line your paper will show through it's core color. I am not too keen on that but.....

Cake Box with Stampin' Up Bride Speciality Paper


Here is a photo of my most recent project that I did for myself. Using Stampin' Up's newest Specialty Paper Bride. You can get templates all over the internet for a "Cake Box" so I am not posting one here. I did create a WPC file for my Pazzles to cut the multiple "Cake Boxes" that fit into an octagon.The rhinestones are heat set using a heat setting tool. The ribbon (5/8 Whisper White Organza) and flowers (Pretties kit) and glitter (Dazzling Diamonds) are all Stampin' Up products. You can do multiple tiers but on this one I only did one tier as an example. This would make a great bridal shower center piece then give every one a "piece" with little goodies in the boxes. If you find any typos that I did not catch....so sorry, I really did a good job busting my left ring finger Saturday night and typing with a finger brace really stinks! I even chipped the bone...it was that hard! Ouch!

Friday, July 31, 2009

Some of my swaps for convention

Here are 3 of my swaps for convention. The little gift bag is a 2-5-7-10 gift bag made on my Scor-Pal. The Haunted Step card has 3 steps and a tall one on the side (I used my Pazzles Inspiration to cut these out). The snowflake card is a Sizzix Bigz Die creation. All stamps and colors are Stampin' Up. I am getting ready to leave for convention on Sunday. This year I am driving the car and boarding my 2 poodles. I am really going to miss my little furry girls. Ok ......See some of you at Convention '09!!

Wednesday, July 15, 2009

Pen Tool Announcement!! It's done!!

It's done! For all of you that have Stampin' Up Pens©...You can now use them with your Pazzles™ Inspiration Creative Cutter. Other pens that will work in the pen holder tool are Close To My Heart™, Zig™, Uniball Signo™ and Sharpie® Fine Tip Pens. I wanted to use my SU pens in my machine so I called upon my best friend....the "nutty professor" aka the prototype engineer to help me! After he made a couple of prototypes that worked, he was able to design a 2 piece mold out of aluminum for me. This part was not free but I did get the "cousin" discount on his work for me! He has a Prototype Injection Molding machine in his garage. (That's really cool!!) So I now know how to make my own injection molded parts! With his help of course! So I essentially "rented" his molding machine and injected my own parts one at a time. Unfortunatly his machine only does one at a time so that was my option!! Started out with basic black and white ABS plastic and then mixed them to get a "zebra" effect. Then added another color to the white and created a purple zebra tool and a turquoise marble one too. My whole intent with this was to create an affordable tool in this tough economy. I am proud to say it's "Made in the USA" by me!! So the introductory price is US$ 15.00 plus $4.95 S &H = US$ 19.95. I have put a PayPal button on the right side of my blog close to the top. I will be accepting PayPal and of course checks and cash! I will be including a second screw in case anyone strips their first screw by tightening down too hard. I am also including a foam pencil grip to help with alignment of smaller barrel pens in this pen holder. Have a great weekend!

Monday, July 6, 2009

I am back after a six month hiatus!

Well time does fly when your busy. The last six months has been a bit of a rollarcoaster for me. January was my birthday month and my sweet adopted Husky Doe became very sick. So at the beginning of February I had to say goodbye to her... She was about 14 years old. Then in March I received the news that my adopted poodle furbaby Muffin had kidney disease. So I started giving her an injection of fluids everyday. But it was not helping like it had in the past with other pets I have owned. So again I had to say goodbye to another beloved pet...Muffin....she was about 13 1/2 years old. Wow losing 2 pets within 4 months is a bit hard on one's heart! Needless to say my mojo flew out of the window for a while. So my mojo is coming back slowly but surely. I still have my 17 1/2 year old poodle Monique and yes I did adopt another furbaby. But that will be another post coming up. I have been working on updating my blog all day and getting ready for the debut of my new Pen Tool for the Pazzles ™ Inspiration Creative Cutter that will be using Stampin' Up Pens!!

Friday, December 19, 2008

Doggie Die Cut

I really have been busy making things but cannot put them on the blog till later due to contracts and some being Christmas gifts (don't want to spoil the surprise)

This adorable little gal began her "life" as a black & white GIF image. Now look at her, Isn't she adorable!! I used Stampin' Up products to ink up the edges and bone. I used a Gelly Roll Glaze pen to color her collar then dipped it in glitter. Of course doggies have wet noses so I applied Crystal Effects on to the nose. Then using a white pen to put white fur on the chest and eyes (oops eyes were done after the photo)

I purchased a new software the other day that really simplified making die cuts for me. I normally design all my own die cuts from scratch or occasionally hand trace a photo to get exact details (Wacom 9 x 12 tablet). Then I manipulate the design so it does not look like the original to avoid copyright issues. I am not a crafter/artist that can draw from my head out of thin air like some, I have to have a model in front of me to draw. Well this new software is amazing on how well it vectorizes and image. Previously I was using a Pazzles SignMax WinPC 2007 version for my Pazzles Creative Pro machine. Now I just bought the SignMax Funtime Scrapbooking 2009 Deluxe version (Which is much like the Pazzles Inspiration software by SignMax). Wow what a difference; no more choppy lines, new fun special effects.... I do have to give credit to Ivan at SignMax in Canada for updating my driver to work with my Pazzles Pro. The image above was obtained from the Graphics Factory. Now having given them credit and linking to their site, I do believe I am following their copyright rules. This next picture is directly from the Funtime software after cleaning up the image and turning it into a paper piecing. You can click on the picture below and get the WPC version 14 file (I hope the link works, If not just email me) Happy Howlidays!! Woof Woof

Tuesday, November 25, 2008

Last Pazzles post.... back to Stampin' Up next post

One of the Pazzles Design Team projects for Sep. was to design 2 titles for a new CD coming out in the future. Boy were mine polar opposites!! I went from Babies to Halloween. Anyway the frightfully good time one uses lime green Stickles for the runny green slime on the caps of the letters. Also the pen tool was used for the lettering on the head stones.
The clothes line "Baby" uses the "kiss cut" to define the outline of the onesie with a border. Isn't the baby one cute! They will be on an upcoming CD sometime in the future.


Monday, November 24, 2008

Secret Message Card

This is a unique card...called a Secret Message card. You open it one way and figure out how to open it the other way and you have a whole different card. This was one of the many cards on the Pazzles Greeting Cards CD that we used for our Sep. Design Team projects. If I were to make another one I would use one less cut/fold, See the prple alternating with the black...there would only be 3 alternating instead of 4. Oh...and don't put your glue in the wrong place either...yup learned the hard way!

Don't Mess With A Man And His Truck

This was my Pazzles Design Team project for August. We were supposed to design something about "Guys". I used the "kiss cut" quite a bit for the detail in the truck. I took a generic picture off the web and hand vectorized the image. The windows are made out of vellum. The grill and rims were silver metalic paper. I used a Stampin'Up tire tread wheel on the tires. All the growth under the truck was stamped with Judith & Heather stamps. The pictures I used were from the Toby Keith concert I had been to recently and Toby always has a FORD Truck front grill on his stage. The pictures were taken when he was singing "American Soldier" The title of this page has a story behind it other than Toby's pictures.....Well this summer I borrowed a friends truck to haul some molding, plumbing and general home improvement stuff. This is a work truck that stinks of working man and smoke...get my drift...yuk. The truck was my friend's "Baby". I used the truck for 6 hours driving 1.5 hours each way up and back a winding road to get the supplies needed (mind you supplies both of us needed) . I get back and proceed to get an earfull of nastiness. I had put molding through the back sliding window to fit it in the bed of the truck. (Big Sarcasm in this next sentence!) Oh My it was touching the head liner in the stinky truck! Oh was he pissed off...not even hearing that I had held down the molding with my heavy purse so it would not hit/bounce off the headliner while I drove his "Baby" . I drove that truck so carefully and nicely compared to how I beat up my jeep. Men!!! Jeez!!! Goodness sakes I would have replaced the headliner if I ripped it, but I did not, I was careful! Never, Never, Never mess with a man's truck especially if there is alcohol and a temper involved!! Also I have known this friend for over 35 years!!! ARGGHH!

Time to start posting again...

Here is the project I did for the July Pazzles Design Team.....Did I say July?? Yup we have to keep everything we do to ourselves for at least 30 days when we submit our projects and designs. This one was using the Swirls and Twirls CD that is available from Pazzles. We also had to make a matching little project to go along with the scrap page. I chose to do a small coaster book that I bound with my Coil Mac. I love the picture of my Husky sleeping on her back. She used to do that when she would sleep on my waterbed.

Saturday, October 11, 2008

Pazzles:©Paper Lace CD

Here are a couple of designs you might see on one of the newest CD's from Pazzles: ©Paper Lace . Available around Nov. 1st. This really is going to be a fun CD for all. There is a design just right for what you will need, from delicate to a more structured style to BOLD! Don't forget to put your pre-order in now! Just in time for those holiday scrapbooks!

Monday, October 6, 2008

Pazzles 2008-2009 Design Team Announced


Yahoo! I made it again! Honestly, belonging to this design team has been very fun! I am so glad I made it again. It really makes me think out of the box. Congrats to all the new and seasoned Pazzles 2008/2009 Design Team!

Friday, July 18, 2008

Etched Glass with Vinyl Stencil

These glasses were created using my Pazzles cutting machine. I cut out a Vinyl reverse stencil and used Armour Etch to etch the glass. Since this was a project for Pazzles I decided to use their Logo on the glasses. I purchased the glasses at Big Lots so they are sturdier and not so delicate. They came out great! Good Idea for Christmas gifts. I started practicing with any jar I could find...Like a mayo jar, Snapple drink..... Any glass with a fairly flat side.

Thursday, May 1, 2008

Summer Flip Flops!

How about a pair of flip flops? Aren't they cute with the Summer Picnic DSP from Stampin'Up. I love the cherry paper the best. I stamped the inside with the Life's a Breeze set. Just love those dark glasses. Especially when you use Crystal Effects/Lacquer on them. The pattern for these actually came from a flip flop of mine that was under my desk. I just traced it with my graphics tablet into my Pazzles software. From there it became this cute make & take card I made for the Stampmania V that happened 2 weeks ago in Long Beach. That was really fun too! I occasionaly e-chat with some other bloggers and it was so nice meeting them in person. I even finally met Rochelle Wick who does all those cute sets on her blog. 2 people from Canada came. Gals from AZ, NY but mostly from within our lovely state of California. For the shoebox make & take I pre-marked everything RT & LT and punched holes ahead of time too so that you could finish the card in 10 minutes or less. Put this picture and some instructions out for people to read....and TaDah they were done in a flash.

Monday, April 28, 2008

I won! I won! I Won Design of the Month at Pazzles!

Some of you know I am a design team member for Pazzles. Ok we are not supposed to post any of our pictures of our creations until they have been submitted and picked by Pazzles. The designs are now Pazzles property! Well now I can post some of the things I have been working on. And I will start with my DESIGN OF THE MONTH winner!! I draw all my own things for my Pazzles creations and rarely use Clip Art. This last month we were supposed to use some of the great designs on an upcoming CD that will be released soon. This is what I came up with. The Cinderella, Pumpkin Chariot and flat Castle in the back all came from this new CD. I created the 3D castle for this layout to utilize these new designs. I love doing 3D things. This must have been my inner Barbie doll coming out when I designed this one. The paper is from the new "2 Scoops" collection from Basic Grey. For my 3D castle I cut out little rectangles to make the brick appearance. Just using Creamy Caramel Stampin' Up ink through the brick stencil. The cute little Pumpkin Chariot Invitation was originally a silhouette that I drew a pumpkin and lines to make the front of the card. The inside of the card was done with the pen tool and one of the PZ max fonts offered by Pazzles.

Microsoft Clip Art by Allison Fillo and How to use with your Pazzles

For all you Pazzles Clip Art junkies I found a great new tutorial about Microsoft Clip Art (WMF) on this wonderful blog! http://stampinwhenican.blogspot.com/ . And here is the PDF file of her informative tutorial. Now I will add a little bit extra of how to get that image in WMF/Windows Meta file into your Pazzles software. Once I have the WMF file just the way I want it, I copy the file and paste it into my Adobe Illustrator CS2. Then resave as an AI version 8 file. Then I open my Pazzles software and IMPORT an AI file. It comes in perfectly.

Another way to use that WMF file you created with Allison's tutorial is to just print the Clip Art and then acquire/scan it into your Pazzles software to vectorize or trace. Here is a picture of a couple of clip arts I did this morning.


If you like them just click the following link:WPC file to download into your Pazzles software. Let me know if this does not work for you and I will send the file to you.
Happy Stamping and Cutting!