Showing posts with label Christmas. Show all posts

Monday, December 22, 2008

Christmas Goody Bags

Last night my friend Deb and I made all her gift bags for her work people. Since she has such a stash of paper we used a lot of her papers adding my Stampin' Up Real Red to compliment the bags. In her bags were a coffee mug with some hot chocolate tins so the outside cello bag was filled with Ghirardelli Chocolate Chips and mini marshmallows and teeny tiny little peppermint pillows. Using the Top Note Sizzix die for the bag topper. I printed off all her work buddies names on to Confetti white cardstock in red using a font called "Santa's Big Secret". Then using the Curly Label punch we punched out the names for the cello bags. The top layers of the paper bags were edged with the scallop punch for a fun effect. The two special bags received some bling in the form of heat set pearls and rhinestones, using the Bejeweler heat setter. I get all my heat set stones and pearls from "Sue's Sparklers" in Escondido CA. The pretty snowflake blue bag used Stampin' Up DSP Ski Slope paper. Now to get my stuff done... All my friends stuff is done. I haven't even decorated the tree yet....Whoa am I behind.....


Sunday, December 7, 2008

Top Note Santa Suit

This cute little Santa suit was made using the Sizzix Top Note die. I cut a strip of basic black for the belt and a strip of Presto Sticky Felt for the center. Using the Curly Label punch and the horizontal slot punch with brushed silver for the belt. I collect all kinds of brads and eyelets so I thought these cute little buttons were just perfect for the finishing touch.

Here is a close up detail of the buttons & felt and how it looks just perfectly furry for the center of the Santa Suit. Ho Ho Ho!

Saturday, November 29, 2008

Snowflake Christmas Card

Here is a quick and easy Christmas card using the Big Shot Stampin' Up Snowflake die and the large Scallop Circle die. I covered the snowflake with Dazzling Diamonds glitter using a liquid glue pen. Topped it off with a rhinestone brad...Done. I am up at the Kern River and the weather is just beautiful but internet service is very frustrating! My lap top keeps disconnecting ...ARGGGGHHH..I have tried to post this 3 times. Needless to say 45 min later...I purposely put a couple pics on mylaptop to upload but this is taking way toooooooo longggggg. Happy Shopping!

Saturday, December 22, 2007

Sassy and Seasonal...New to me!


This is one of my Christmas Cards this year. I recently hunted down this stamp set. It was retired, but I had to have it because of the poodle. Plus none of my stamping friends had seen this set yet. I used the Simply Scrappin' set Winter Bright from Stampin' Up. I really love the colors and the textured paper. I wish we could get textured paper by the single colors. The base for the stamping is out shimmery white paper. Then I used Twinkling H20s to paint the stamped images in and put Stickles Star Dust on some areas. Wow this shimmers and sparkles! As you can tell I painted the poodle to match my little "red" fur babies. So much to do and not enough time to do it in. Less sleep more work! Ho Ho zzzzzzzzzzzzzzzzzz

Retired set...New to me!

One of my gift bags using rollers and Sassy & Seasonal. This set is new to me, but it is retired. If has a poodle in it I have to have it! Rolled the tissue paper and bag with So Swirly and Real Red. Cut out the Sassy stamped images and put them on dimensionals. The gift is for my upline Sharon Comer....psst don't tell her I bought her an ATG gun... Sssshhhh.....Hope she likes it!

Tuesday, December 18, 2007

Quick Scrappin' Kit Card

This was made in a matter of minutes. Using what I had just cut for the 10 minute nugget box. Adding some Real Red to the Textured Wild Wasabi, I used a piece of snowflake paper on the red. With a quick stamp from the Warm Words set punched out with the large oval punch and gluing it to a metal window from my Hodgepodge hardware, I added a little red gingham ribbon to tie it together with some bling rhinestones, (gotta have bling at Christmas) set with my Bejeweler Quick and easy. (Which most of my friends know, I don't do quick and easy often) All supplies are Stampin' Up except the rhinestones.

Sunday, December 16, 2007

Stazon and Glass

I got a little happy with the Staz-On Cotton White! Somewhere on one of the Yahoo groups I had heard that you could use the giant Snowflake Stamp to add some fun decorating to your windows! Basically anything glass. Sorry I can not recall who to credit for this great technique. I tried a round mirror and the first was an oops, it came off with the remover. Then it worked! I am going to make a candle to put on this for fun with some of that funky snow like stuff you add water and it fluffs up like real snow. We do not have snow in Orange County so that kind of stuff is fun. I am sure If I had to shovel it or drive in it I would have a different opinion about it. I also did it to a window you can see as you walk up my steps but that picture came out hard to see. Ok back to the laundry!

Friday, December 14, 2007

Voluptuous Bag & Tag!


Here is the cute Voluptuous Noel Bag I promised...finally. Been so busy this week I have not been able to upload the sexy set. Oh how I hate working with mariboo feathers. They are worse than glitter. Everywhere, they get absoulutely everywhere. ppppttuuuu! I plan on making a whole year of different bags and cards around Miss V. What do you think? Do you think they would sell at my local craft boutique? So far I like the Liquid Applique the best for the cards and the feather boa for the bag. I also tried heat & stick and flocking. Cute but no dimension! I designed the diecut HO HO HO with my Pazzles Pro. I stamped the sides of the bag with the small Stampin' Up Ho Ho stamp from the set Pictograms. The trick to stamping the sides of the bag is using a shoe box inside the bag and stamp .

Saturday, December 8, 2007

Voluptuous Noel

This kind of reminds me of a Betty Boop style. I have had this in my mind for months but have not taken the time to draw it up. My original inspiration came from Ann Clack months and months ago. I drew the body, dress, belt, and buckle in my Pazzles software. I wanted more than one, so hand cutting was out for me. (If you want my pattern to trace I can email it to you.) The top of the dress has Liquid Applique applied and heated. The necklace is some very tiny wrapping beads (red, green & white) I purchased at Michaels. Siver Stampin' Up glitter on the belt. I used my "Bejeweler/EZ Glitzer" to heat set Swarovski rhinestones for the "ruby" necklace and corner adornments. The NOEL stamp came from the Stampin' Up set "Many Merry Messages" To make the "cleavage" appear bustier I added Creamy Caramel chalk between and around the shoulders. I have what is called a kiss cut in my software which makes a line of dashes and that is how I underscored the "cleavage". Chalking and very lightly inking the dashes with Going Grey to make them look like a shadow. Ummm I wonder if "NOEL" is Santa's favorite helper? Ho Ho Ho! More variations in whole sets to come tomorrow. Wait till you see the bag. Now its off to Cirque du Soliel...for a Saturday matinee.

Sunday, December 2, 2007

Candy Nugget Box Revamped for the Scor-Pal

Yahoo! I'm a Guest Designer for Scor-Pal, Thank you Diana! Here is my tutorial for using the Scor-Pal for creating nugget boxes. If you would like a copy in PDF form please use my email link on the right side of this blog and I will gladly send you a copy! All this information will be available on the Scor-Pall website in approximately 2 weeks! And don't forget to check out the new Dec/Jan newletter, with great new ideas and designs! Please excuse if this looks a little funny, the post publisher was acting up and I could not get the pictures aligned correctly.

Candy Nugget Box Revamped for the Scor-Pal
New Directions © by Sue Reynolds
www.HotPawsCreations.blogspot.com

3 Candy Box Single Row
*4 ½ x 6 in bottom
*5 x 3 ¼ in lid

4 Candy Box Single Row
*4 ½ x 7 in bottom
*5 1/8 x 4 ¼ in lid

5 Candy Box Single Row
*4 ½ x 8 in bottom
*5 1/8 x 5 ¼ in lid

6 Candy Box Single Row
*4 ½ x 9 in bottom
*5 1/8 x 6 ¼ in lid

7 Candy Box Single Row
*4 ½ x 10 in bottom
*5 1/8 x 7 ¼ in lid

6 Candy Box Double Row 3 + 3
*5 ¾ x 6 in bottom
*8 3/8 x 3¼ in lid

8 Candy Box Double Row 4 + 4
*5 ¾ x 7 in bottom
*8 3/8 x 4 ¼ in lid

10 Candy Box Double Row 5 +5
*5 ¾ x 8 in bottom
*8 3/8 x 5 ¼ in lid

All of the above bottoms are made by scoring ¾ from edge then ¾ from that score line (1 ½ from edge) all the way around. Then cut according to diagram 1.

Fold tabs and glue. Then fold in double walls and glue. See diagram 2

Single row sleeve lids are scored 1 in from edge then ¾ from that score line (1 ¾ ) Form a sleeve around filled nugget box and tape closed. Using a filled box will loosen the sleeve so it can be opened and slid easily for recipient! See diagram 3

Double row sleeve lids are scored 2 in from edge then ¾ from that score line (2 ¾ ) Form a sleeve around filled nugget box and tape closed. Using a filled box will loosen the sleeve so it can be opened and slid easily for recipient! See diagram 4

Note: *Make sure you do not score the 5 1/8 side for single row boxes.
Note: *Make sure you do not score the 8 3/8 side for double row boxes.

I would recommend making one out of scrap paper 1st and keep that as your model for the future. Also I would use Sticky Tape/Terrifically Tacky Tape/Scor-Tape/ATG for holding box together.

Diagram 1


Diagram 2


Diagram 3 &4


Box Bottom Scoring


Scoring Sleeve


Cutting & Folding


Saturday, December 1, 2007

Nuggets Nuggets and more Nuggets!! I Love Chocolate!

This has been a very fun project! I have been making Lots of Nugget Boxes with my Scor-Pal scoring tool. I updated the nugget box measurements to work easier with the Scor-Pal , and made up a revamped tutorial in the process. I will be uploading the file in a Word and PDF format file within the next week. So keep your eyes peeled for my upload. Coincidentally this last week Splitcoast had a Technique Lovers Challenge #144 to make nugget boxes with Acetate sleeves. So the baby box was created!
P.S. Sometime this week I will be posting the tutorial for everyone to upload in either a Word or PDF format. I have submitted it to the Scor-Pal website and want to release it around the same time they do. Thanks for asking Shannon.

Ho Ho Ho Santa's Nuggets have Bling!

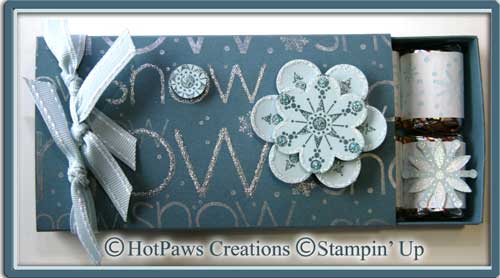
These are my favorite non-stamped (on the outside) Nugget Boxes. I was going to make these with a plain belt. Then I bought the cutest candle at Kohl's that had the dot/dash detail along with the eyelet holes...Next thing you know my boxes had much better detail all thanks to a candle! On the nuggets I used a black strip of paper with a brushed silver "belt buckle", then using my teeny tiny Simple Serif stamps I then punched the silver embossed letters out and glued Ho Ho Ho to the "tiny belt". I like the silver better but had to make the gold too! Both are edged with Liquid Applique for a little fluff. These nugget boxes are so much fun to make....Get your own Scor-Pal and these boxes will be a fast and easy holiday gift! Can you tell I love my Scor-Pal?The belt buckle was made from the SU Key Tag punch, then sliding it back in the punch to make it smaller. Then cut some slits in it for the black belt.

Quick and Easy Nugget Boxes

These two were by far the easiest to do. Not much detail just ribbon around them. The red one is Double Sided (DS) paper and a quick stamping on the Avery 8160 labels with the small "Priceless" flourish. The black and gold is done with a wheel on both the sleeve of the nugget box and the labels. The gold labels are from Avery but the ink takes a really long time to dry, you have to handle with care not to smear them. I really miss the Organdy ribbon that SU used to sell. Much classier I think.


Snowman Nugget Box


I think this is one of my favorites! I just love how easy it is to use a matching wheel roller on the Avery 8160 labels. The small wheel fits just perfect on these labels! And to make sure your line is straight I do use the alignment ruler. Then use your watercolor crayons and aqua painter to add your color.

Friday, November 30, 2007

I've been playing with Candy! Nugget Candy that is!


I've been busy playing with candy and a tutorial this week! This cute little Nugget Box holds 2 rows of 5 Hershey Nuggets. I had purchased 2 large and 2 small empty wheel cartridges and filled them with my refills for my Encore Gold & Silver and labeled them with my P-Touch. So today I decided to use them on the Bayou Blue Paper to see the effect. I like the silver with the blue but had to add a little bit of Stickles on the words just for a little bling effect. In the next couple of days I will upload all the boxes I did plus some gift/ornament cards. My tutorial will be posted as soon as I get the ok from the website that will be posting it.

Friday, November 23, 2007

Simple Gold and Silver with Black


Simple Gold and Silver can have such an elegant impact. These were stamped with Gold and Silver Encore Ink on black paper and then embossed with Gold and Silver embossing powders from Stampin' Up. For the tree I used my "Bejeweler/EZ Gliter" to heat set Swarovski rhinestones I bought from Sue's Sparklers. These work great on T-Shirts too. The angel is from the Stampin' Up set Holy Triptych (Mini Catalog ends 11/30) The tree and saying are from the Stampin' Up set Wonderous Gift. P.S. Did anyone notice these are black cards on "Black Friday" he he...sorry had to do it!

Monday, November 19, 2007

Gingerbread Goodie Bag and Tag!


Isn't this a cute little Gingerbread Man! I used my Scor-Pal to make this 2-5-7-10 bag that I cut all but one flap for the fold over, and then edged with a corner rounder. I used Very Vanilla CS and my Color Spritzer tool from SU to splatter Creamy Caramel Pen ink as a background. Now for the stamps!! A Chemistry with Paper has these adorable new Christmas sets and this one is "Holiday Treats". The little guys are great for the edge and you can see exactly where to put them because the stamps are clear! It is hard to see but I used Liquid Applique for the icing and a clear Gelly Roll pen over the other lines to enhance them. The gift tag is matching with the little guys on the inside! Boy it's hard to type with a poodle in my lap that wants to help on the keyboard!

Sunday, November 11, 2007

Tag Punch Wreath


Our Stampin' Up group; Women in Ink met yesterday with Kathy Thorn one of our upline from Utah. Some of her downline supervisors and managers from our area came also. This was a new group to me. Wow, I am impressed with these people. Linda Jensen, her husband and some of her group were so nice. She seems to be quite the "Den Mother" . She and her husband run the business together and make quite a team. Enough said...
We had a shoe box swap and card contest. This was my entry. Here are some brief instructions that I layed on the table for people to make this card. I tied for 1st place with Lis Ljung (my up upline. Whoo Hoo!) I stamped and embossed the tags before hand for a touch of glitz and then gilded the edges with a gold pen for elegance. I will post a picture of Lis's card later.

Pretties Kit Stick Pin


For my meeting yesterday I decided to get into the holiday spirit and wear my new apron with a stick pin I made from the "Pretties Kit". I stamped (Ballet Blue Craft ink) and embossed the cute little sentiment from the "Punch Pals" set. Then I punched scalloped circles out of silver paper that I had stamped on (my scallop punch died right after this project too) Then I stamped (Real Red Craft ink) and embossed the same stamp punching with a circle punch. The center punched circle was then edged with a glue pen and dipped in glitter. I popped out one of the rhinestones from the "Fire & Ice" rhinestone brads. All this was layered with dimensionals. Flat back pearls from the "Pretties Kit" were then glued on. Glue the hat pin from the "Pretties Kit" on the back of the scallop circle, add dimensionals and the put another punched scallop circle on as the back.

Wednesday, October 24, 2007

SnowMan Soup Container


This is what I call a Tent Container: 6 x 12 piece of paper, score at 1 in, 5.5 in, and 7.5 in. Fold the 1 in top over the triangle fold and there is your tent. Punch holes in all three layers for ribbon to feed through, then glue a 6in baggie inside and fill with goodies. I filled mine with Hot Chocolate packets, peppermint rounds, and Hershey's Kisses....SnowMan Soup! Stampin' Up tools: Flaky Friends Stamps, Snowflake Punch, Snowman Fun Wheel, Hostess Set: In the Spotlight. Colored in with H20 pencils and crayons.